Tuesday, December 17, 2013

Boxing Them In...Interior Framing

Heeeeyyy yyoouu guuuuyyyysss!(name that movie) We have some crazy progress upstairs! Insulation, wiring, drywall! I'll show you all that soon. First, I'm going to show you a few pictures of the interior framing.


This picture is looking into my son's bedroom. That beautiful black plastic is the access door so the guys can get in and out. We still don't have a staircase, but we are very close to it. That doorway has been closed up and they have put the window in now that they have had the drywall delivered. I'll show you why they kept that mystery door there for such a long time in another post.


You can see the doorways to the kids' rooms here. Sorry the picture is a little wonky. I had to hold the camera in the air above my head to get an accurate shot. I'm vertically challenged, ahem.


This is looking directly into what will be the playroom. Hallelujah! A special place for toys and play things! I think this will be my saving grace.


To the left, behind the ladder, will be the bathroom. I know. It's kinda hard to picture. For me too. When the contractor needed me take a look upstairs so we could decide how the bathroom would be laid out, I needed him to lay down boards in the dimensions so I could get a better visual picture. 


One last picture. This is the view out one of my son's windows. It's hard to see, but in the summer when the trees are in full leaf, it's going to feel like a tree house in his room. I love that! :)


Thursday, December 5, 2013

Second Stories

Hi all! We have a second story! Well, technically you have to climb a ladder and through a window to get in it, but we have a second story!! The gas company made it out this week (finally) and moved the meter, so we are now ready to have concrete poured for the floor. Unfortunately it looks like it will probably be spring before the driveway gets poured. Wah waaaahhh. We've just run out of good weather. Had the gas company moved the meter a week ago, we'd be golden. No such luck. It's not overly important, it will just be a mess. And now, on to the pictures!


The chimney had to be removed  because the second story will overlap this portion of the roof. We do have a fireplace, but seven years ago during our first remodel, we had converted our traditional wood burning fireplace to one with ventless gas logs. So there was no longer a need for the chimney. Money well spent, by the way. That fireplace puts out a ton of heat! Early last March we had to replace our furnace, and that fireplace kept the house in the mid sixties for the week it took for it to be installed. That, and space heaters. It was still too cold for my kids and I to stay here, but it was ok for the husband and the dogs. ;) 


What the?! I can see where the windows will go!


The longer window opening, in the above picture, is the access area they have been using 
to get in and out.


This is the back of the garage. You can see the door opening for access in and out of the garage to the backyard. And above on the left, is a bedroom window. To the right of that, somewhere in the vicinity over that man door opening, will be a bathroom window. We had to make some amendments to how the stairs are going up. Therefore, we couldn't make a decision as to where the bathroom window was to go yet.


And a roof!!


Friday, November 22, 2013

Magic Tarps

Hey hey! Sorry it's been a while since my last post, but last week there wasn't any work being done. The reason for that is because we were playing a waiting game with the gas company. We needed them to come and tell us where we could relocate the new meter. They came on a Wednesday afternoon and we discussed the project, and they decided what would need to be done. Now, let me just tell you, this is not something you want to have done. Avoid it if you can. The reason I'm telling you this is because it is very expensive to have this done. Once upon a time, you could hire a licensed plumber, or if your contractor was licensed with the proper qualifications, they could make the adjustments to the meter and new line accordingly. That is no longer the case. My particular natural gas carrier has now taken back ownership of the gas meters on YOUR houses. That makes them their property and you are not authorized to make any amendments to them. That has to be taken care of through them. You, the homeowner, are responsible for the lines that run to your house though. So, once the gas company comes to survey your project, they determine what the cost of this will be. And the way they determine the price is by footage. They have a predetermined scale that states three feet and less is a certain price, over three feet to twenty feet is another price point, and goes on from there. We fall into the over three feet category. And I won't tell you exactly how much it was, but I will tell you it was over a thousand dollars. Ouch. Unfortunately, this is a necessary evil. But that did not make writing that check any easier. Once that was taken care of, we could move on. Then it snowed. So, inclimate weather makes for no work. But then the following day, this showed up!


A bunch of them, in fact! Windows, and shingles, and lumber, Oh My! There is magic under these tarps. Since the lumber arrived, the guys were ready to start framing. First, they removed the siding from this end of the house.


They will be removing all of it once the addition is ready to be sided, so they can side the whole house all at once. Can't wait to show the colors! And there will be some stone too! After they removed the siding, they needed to set a temporary electric pole. As you can see in the above picture, the electric pole and meter are on the side of the house we are building on to. The new permanent home for them will be on the back of the garage. So they set the pole. Then you need to have the power company come and connect the electricity to your pole. This also costs money, but it's a drop in the bucket compared to what the gas company charges. And just an FYI, my contractor was told that the power companies are changing their policies to be similar to what the gas companies are doing. Luckily, we made it in before any of that goes into effect.


This only took about 15 or 20 minutes to complete. Once we were up and running again, this is what happened.


This is what it looked like after about three hours.


This was the end of the first day of framing. They removed the siding, set the pole, and framed the garage walls in one day.


I couldn't believe how much larger the structure looked after getting some visual boundary lines!


Here we are so far. We are ready to move up to the second story!


I'm so stinkin' excited about this little back door, I can't stand it!


This is the door that people will use to enter the house from the garage. The garage is attached, but technically, you won't be walking straight into the house. This opens on to the porch, which is covered, and large. So there is plenty of room, and you are protected from the elements. I had the option to have this open directly into my living room, and I chose not to do that. It wouldn't have been a good fit for our lifestyle, and to be honest, it didn't match my vision. And it would've completely interrupted the flow of the room, as well. Having never built anything from scratch before, I find everyday of work fascinating. And to me, what's under those blue tarps really is magical. Have a great weekend!


*Lumber and materials were purchased from Keim Lumber


Monday, November 11, 2013

Finding My Footing, er, Footer

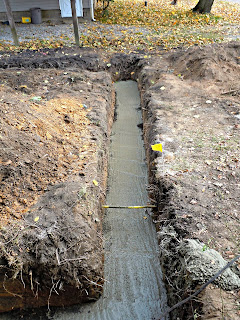
Hello! I'm getting so excited to get to show you some of the finishes I'll be using! The pretty stuff! But, I have  to crawl before I can walk. So, before I can show you any of that, I'm showing you something important. Not pretty, but important. As in, the house needs to stand upright for another hundred years or so. We now have a foundation! When the excavator was here, they dug the footer at the same time in an interest to save time and money. They completed all the excavation within a two day span. Concrete from the old garage, driveway, and patio first, and the footer on the second day.


It's a good day when you wake up and there's one of these babies in your yard!

The first thing we (and by we, I mean not me, in any capacity)  needed to do was measure the dimensions of the addition.  We decided in the planning phase that the size will be 22x24. We couldn't really go any bigger than that because, in my area, you need to keep your permanent structures three feet from the property line. And towards the back of the property we run into the well. We also don't have municipal water in my little village. So, that's how we settled on the size. As I mentioned before, in this post, I had already called our utility providers to mark lines that could pose a problem. My contractor went ahead and dug for the lines where the gas company had marked them, just to be sure.


Yahtzee!
So, now we where ready to go. 


They are checking the depth here. It needs to be between 32 and 36 inches deep which is below the freeze line. The following day, they were ready to have the concrete guys come and get started. And then this little guy showed up in my yard!


We had originally planned for four inches of concrete, but the block guys said, "no dice" so we ended up with eight inches.


They let it set up over night, and came back the next day to set the block. 


We ended up with five rows of block on top of the eight inches of concrete.


And this is it after the block layers were finished. The block set up for a couple and then it was time to backfill.


This is seven tons of fill sand, and we might need some more. But, it's actually starting to take shape now! Next week they will start the framing, and I can't wait!


These guys are on a break. See you next time!


Wednesday, November 6, 2013

I Dig...Dirt?

Hey there! We have dirt. Everywhere. But we have the footer dug. And the concrete has been poured! The blocks will be set tomorrow. But first, before any of that happened, we rented an excavator to remove the old concrete floor from the garage and also remove the driveway. The rental company dropped it off about 7:45 a.m. on a Saturday morning so we had it all weekend. My contractor decided it was best to go ahead and do the removal and excavation at the same time. It saved a lot of time and money not having to bring back the heavy equipment more than once.


 Let 'er rip, tater chip! From my end, the old floor seemed to come up fairly easy. We did decide to leave a small section of patio, instead of taking it all up, so that we wouldn't be walking directly into the mud out the back door. And when we add the deck in the spring, we can deck right over it.


It took about five hours to remove ALL the concrete. And that's including the time it took to unload the dumptruck when it was full. And this is what we had at the end of the day.


In this picture, you can see the section of patio we chose to keep. I'm so glad I made the executive decision on that! And here's the view coming down the street.


Better, no? There's going to be bit more yard to mow!


Annndd this might have something to do with the dirt all over the house. ;)